My boyfriend has a friend who has worn the same cap for 30 years. It is a vile thing that needs to be put to rest. Everyone on the planet who knows and loves him has tried to replace that cap to no avail. My goal this Christmas was to create an exact replica of his cap so that he can finally get rid of that decaying monstrosity on his head.
This is the pattern that I selected:

This hat pattern most closely resembled the cap that this gentleman wears. The only difference is that it comes down a bit more to the base of the skull and slightly covers the ears.
This is the link to the the website if you wish to order the pdf pattern:
https://www.etsy.com/listing/228701395/sewing-pattern-taylor-1920s-gatsby?ref=shop_home_active_2
I found the pattern itself to be very clear with the instructions and sooooo simple! It is amazing that these hats are so expensive. The cost of the pattern was $17. USD and the materials were only about $14.00 CDN. Timewise though, it was a lot since I had to go slow with the sewing and there were many finicky moments.


There was a particular order in piecing the sections together so that it would sit nicely on the head. I used a sewing marker and wrote on the back of the panels to make sure that the left and right sides would not be confused.
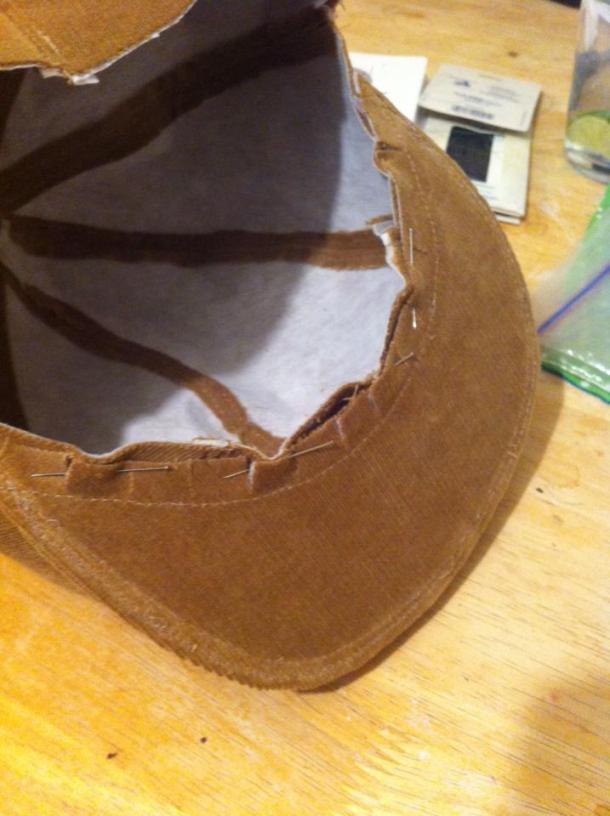
Here is a shot of the hat completely pieced together:
The visor or brim was the most challenging part of the hat. The pattern called for me to find an old baseball hat and recycle the brim. I could not find a baseball cap with a brim as wide as the pattern called for, so I went to the local fabric store to ask for advice. The clerk there suggested that I use the plastic from a vinegar bottle or something like that. I did not have a vinegar bottle, but I did find a car window washer fluid bottle and it worked superbly!

There was a bit of a dimple on the edges so I laid a towel over it and with a hot iron reshaped the rim so it was flat. Then I used the iron to shape it with a bit of a curve. It worked like a charm. Throughout the sewing, I used a leather needle in my sewing machine and there were no difficulties. The plastic was the right firmness and light enough that it did not destroy my sewing machine.
The next step was to sew in the the lining. I used a REALLY expensive lining that was meant for coats. It really makes the hat look luxurious. ANDDDDDD because I only needed a small amount of the fabric, it was not cost prohibitive.
Here is a shot of the hat completed with lining and also a detail shot of the lining itself:


One of the finishing details is that I had to sew a ribbon or facing of some kind around the inside headband. The pattern did not call for the width of the band so I asked the clerk at the fabric store. She suggested a single bias tape at 1 cm wide. I would suggest having a width of at lease 2 cm! It was not wide enough and I had to do a lot of extra things such as sew the band in place because it would not hold when I folded it over as the pattern suggested. It also did not hide all the rough work at the brim so I unfolded the single bias and there was barely enough to wrap the rough edges at the brim and sew again. It looked really sharp with once I sewed everything in place though.
The last detail was to sew a button on the top of the hat. I did not realize that there are tools to put the fabric button together, so I faked it until I ‘maked’ it.
Here is a shot of the finished cap. As I had said, I made it for my boyfriend’s friend. He absolutely abhorred the hat and refused to even take it home. It was SO much work and I learned a lot by making it. I really wished he like the cap and would wear it, but in any case it was worth the effort. I cannot believe I actually made this cap.
I hope you enjoy it!

I would much appreciate any comments!
Thank you,
Sheri

Sheri, you did an absolutely fantastic job on that hat. It looks perfect. Love the plastic container tip. I’ll have to remember that one.
LikeLiked by 1 person
I don’t sew, so appreciate the work that went into making this hat. I love that style, even for women to wear.
LikeLiked by 1 person
Thank you. I have a female friend who requested a cap like this. Maybe I should try sewing a cap for her. I think she would probably wear it.
LikeLike